WordPress’s widespread use has attracted the attention of cybercriminals, with unencrypted connections remaining an entry point into many WordPress installations. HTTPS (Hypertext Transfer Protocol Secure) offers a defence against these threats, encrypting data transmission between your site and its visitors.
Without HTTPS, your WordPress site’s data travels unprotected across the internet, open to interception and manipulation. This vulnerability exposes your site to man-in-the-middle attacks, data theft, and other security risks that can compromise both your site and your users’ information.
Recognising these risks, WordPress advocates for widespread HTTPS adoption as a security standard. HTTPS is now a critical security feature for all WordPress sites, regardless of size or content.
This article will explore how HTTPS protects WordPress sites and user data, the specific security vulnerabilities it addresses, and how to overcome implementation challenges. By the end, you’ll understand why HTTPS matters for your WordPress site’s security and how to adopt it effectively.
Why you need to force HTTPS on your WordPress site
If you’re still unsure how useful HTTPS is to your WordPress site, this section should nudge you towards seeing its value.
Risks of not using HTTPS
Operating a WordPress site without HTTPS exposes you and your users to several significant security risks:
- Vulnerability to data interception and manipulation during transmission, as unencrypted data can be easily read, stolen and/or modified by attackers.
- Potential for session hijacking and cookie theft, where attackers can steal user credentials and impersonate legitimate users.
- Increased susceptibility to man-in-the-middle attacks, allowing malicious actors to intercept and alter communications between your site and visitors.
- Browsers flagging your site as “Not Secure,” potentially deterring visitors and damaging your site’s reputation.
- Negative impact on search engine rankings, since HTTPS is a ranking factor for search algorithms.
- Loss of user trust and site credibility due to visible security warnings in browsers.
- Inability to use certain features that require secure connections, limiting your site’s functionality.
- Potential legal and compliance issues, especially when handling sensitive data without proper encryption.
- Increased vulnerability to cross-site scripting (XSS) attacks, as unencrypted connections make it easier to inject malicious scripts.
- Risk of malware injection through unsecured connections, potentially compromising your entire site.
Benefits of Forcing HTTPS
Forcing HTTPS opens the door to several benefits, including:
- Ensures all connections are encrypted, even if users enter “http://” URLs. This automatic redirection to HTTPS protects user data regardless of how they access your site.
- Prevents downgrade attacks where attackers attempt to force connections to use insecure HTTP.
- Maintains consistent security across all pages and resources on your site. This uniform approach prevents security gaps that could arise from mixed content or partially secured pages.
That said, HTTPS protects data in transit, but it can’t safeguard against all vulnerabilities. Complement it with regular updates, strong passwords, two-factor authentication, and security plugins, alongside proper file permissions, secure hosting, and regular backups.
Step-by-step guide to implementing HTTPS on WordPress
To secure your site with HTTPS, you’ll need to install an SSL certificate, which provides verifiable proof to site visitors. To see one in action, just visit a reputable website and click on the padlock icon on the address bar!
That icon is a big part of why their site is trusted – it signals credibility right off the bat. Without it, you risk users seeing your site differently, maybe even doubting its reliability.
Most hosting providers can install an SSL/TLS certificate on your site, so you should contact them or go through the documentation to find out how. Alternatively, you can do it yourself by following these steps:
Step 1: Obtaining the certificate
The first step is to secure an SSL certificate from a Certificate Authority (CA), either paid or free.
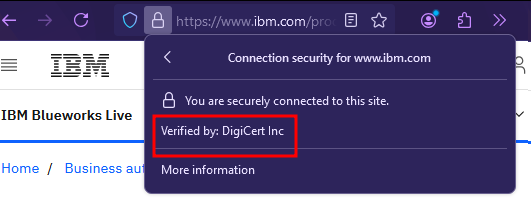
Paid CAs include DigiCert and GlobalSign, but a free option like Let’s Encrypt is just as credible and should be enough for most. In fact, Let’s Encrypt is backed by heavyweights like AWS, Cisco, Mozilla, and Yubico, so you’re in good hands.
If you’re not sure which CA to go with, just visit a reputable site, click the padlock icon, then expand the information and take a little inspiration. For example, here’s what it looks like on IBM’s website:

Step 2: Installing the certificate
With the certificate at the ready, the next step involves installing it through your site’s control panel.
Again, you can hand the certificate off to your host and have them install it for you, but you can also do it manually. The DIY route might look different depending on your hosting provider, but here’s how to do it through cPanel:
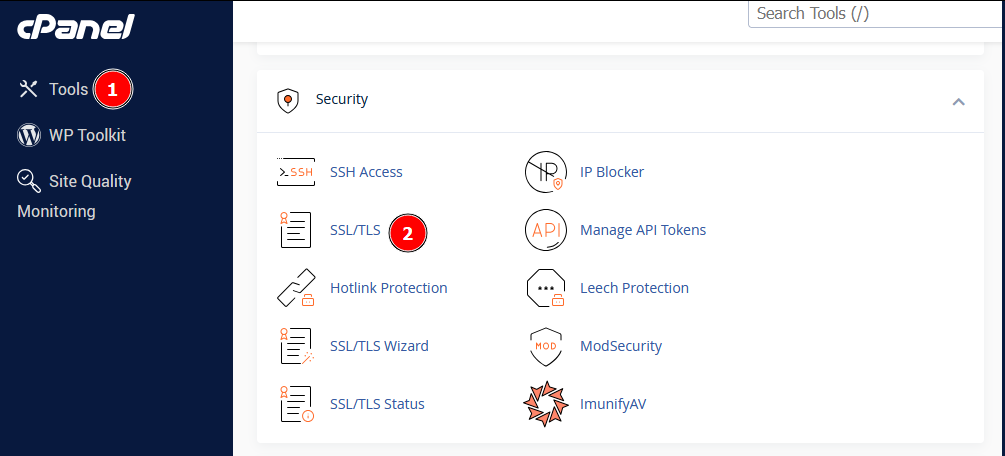
1. Go to Tools > Security > SSL/TLS.

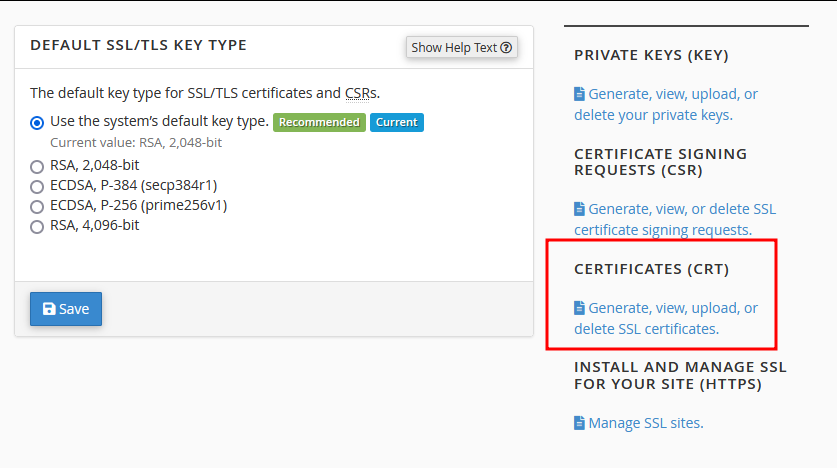
2. From the menu on the left, under Certificates (CRT), click on Generate, view, upload, or delete SSL certificates.

3. Under the Upload a New Certificate section, enter your certificate details into the text box or upload it as a .crt file.
4. Click on Upload Certificate to complete the process.
Verify the installation by opening your site in another tab and checking the address bar for the padlock icon. Click on it and expand the information to review your certificate’s details.
Step 3: Forcing HTTPS redirects
This next part is general house cleaning, where you force HTTPS on all your URLs and resolve mixed content errors. Mixed content errors occur when your HTTPS-secured page loads some resources (like images or scripts) over unsecured HTTP connections, potentially exposing your site to security vulnerabilities and causing browsers to display warning messages that can erode user trust.
Follow these steps to force HTTPS on all URLs:
1. From your WordPress dashboard, go to Settings > General to change the WordPress Address (URL) and Site Address (URL) addresses to start with https:// instead of http://.
2. Use SFTP or your hosting control panel to access your site’s installation folder and find the .htaccess file in the root directory. Create a backup copy of it before editing it in the next step.
3. Open the file in a text editor and add the following code:
RewriteEngine on
RewriteCond %{HTTP_HOST} !^www\. [NC]
RewriteRule (.*) https://www.yoursite.com%{REQUEST_URI} [R=301,L]
4. Save the file.

Enhancing WordPress security beyond HTTPS with Shield Security PRO
While HTTPS is a non-negotiable for WordPress security, it’s just one piece of the puzzle. Shield Security PRO offers a comprehensive security solution that builds upon HTTPS to create a stronger defence for your WordPress site.
Shield Security PRO complements HTTPS with several key features:
- Traffic filtering and IP blocking prevent brute force attacks by identifying and blocking suspicious traffic patterns.
- Login protection with two-factor authentication adds an extra layer of security to your user accounts.
- Automatic plugin and theme vulnerability scanning identifies potential security risks in your site’s components.
- Real-time threat defence system actively monitors and responds to emerging threats.
These features work in tandem with HTTPS to create a multi-layered security approach – HTTPS encrypts data in transit, and Shield Security PRO protects your site at multiple entry points, from login attempts to file modifications.
Beyond direct security benefits, Shield Security PRO indirectly boosts your site’s SEO. By preventing security breaches that could lead to blacklisting, maintaining site uptime, and protecting against SEO spam injections, it helps preserve your search engine rankings. Additionally, its ability to detect and block fake web crawlers helps maintain your SEO integrity.
Importantly, Shield Security PRO allows you to implement these advanced security measures without deep technical expertise. Its user-friendly interface and automated features make enterprise-level security accessible to all WordPress site owners.
Take action: Secure your WordPress site with HTTPS and Shield Security PRO today
Forcing HTTPS will make your WordPress site more secure, but you shouldn’t stop there. While HTTPS ensures encrypted communication, it doesn’t cover all potential vulnerabilities like malware, brute force attacks, or outdated plugins. That’s where Shield Security PRO comes in.
Shield Security PRO goes beyond just offering protection and actually simplifies security. Instead of juggling multiple tools or spending hours on manual updates, it handles the heavy lifting. From automatic malware scans and file integrity monitoring to patching plugin vulnerabilities, it ensures nothing slips through the cracks. Its intelligent firewall goes beyond basic protection, stopping suspicious traffic and bots before they become a problem. Plus, two-factor authentication secures your user accounts, adding an essential layer of defence.
By combining HTTPS with Shield Security PRO’s proactive, multi-layered approach, you’re avoiding threats instead of just reacting to them. It’s an all-in-one safeguard for those who want more than surface-level security.
Take the next step – get started with Shield Security PRO today and keep every corner of your website safe and sound.
