
Are you noticing unfamiliar Japanese characters popping up in your search results, or perhaps an unexpected drop in website traffic? If so, your WordPress site might be suffering from a Japanese keyword hack. This troubling scenario involves hackers inserting spammy keywords, often in Japanese, into your site’s content.
The result? A potential plunge in search engine rankings, a damaged reputation, and the loss of visitor trust.
Thankfully, you can detect this in its early stages by looking for unusual Japanese text in search engine results. Other signs include sudden decreases in traffic, and alerts from Google Search Console. Addressing these issues swiftly will prevent further damage.
However, an even better way to fight these hacks is to prevent them by using versatile security tools like Shield Security PRO. By identifying and banning harmful bot behaviour, this WordPress security plugin ensures your site remains secure against such attacks, and your peace of mind intact.
In this article, we’ll show you what to do when you notice a Japanese keyword hack, and explore some user-friendly prevention methods.
Step 1: Identifying the root of the problem
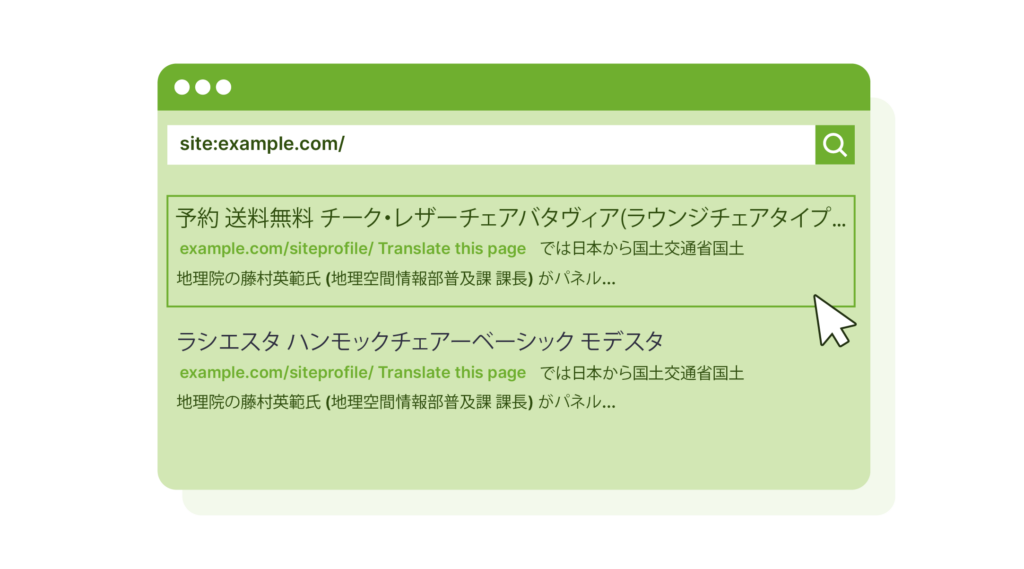
To start, enter “site:[YourSiteName].com” in Google’s search bar. This search can reveal if spammy, often Japanese, keywords have infiltrated your site’s search listings – a clear sign of this specific hack.
You’ll of course want to understand how hackers accessed your site to cause this damage. This usually happens through:
- Out-of-Date & Vulnerable WordPress Core: Outdated versions often have known vulnerabilities that hackers will try to exploit.
- Out-of-Date & Vulnerable Themes and Plugins: Old or abandoned plugins and themes that contain known vulnerabilities are easy targets for hackers.
- Passwords and login security: Weak passwords or inadequate login protections can open doors for unauthorised access.
- Bot protection: Insufficient bot security can lead to brute force attacks, where hackers attempt to crack passwords, exploit vulnerabilities, and inject malware into your site.
When you’re dealing with the Japanese keyword hack, you’ll need to inspect your WordPress site, Google Search Console account, and hosting logs. Checking these will reveal the full scope of the attack, and show you what you’ll need to clean up.
In particular, start by checking your WordPress files for any unauthorised injections. If you don’t know what these files normally contain, consider consulting with a professional. Changes can sometimes appear harmless, blending in with pre-existing code, making it tricky to spot the malicious ones.
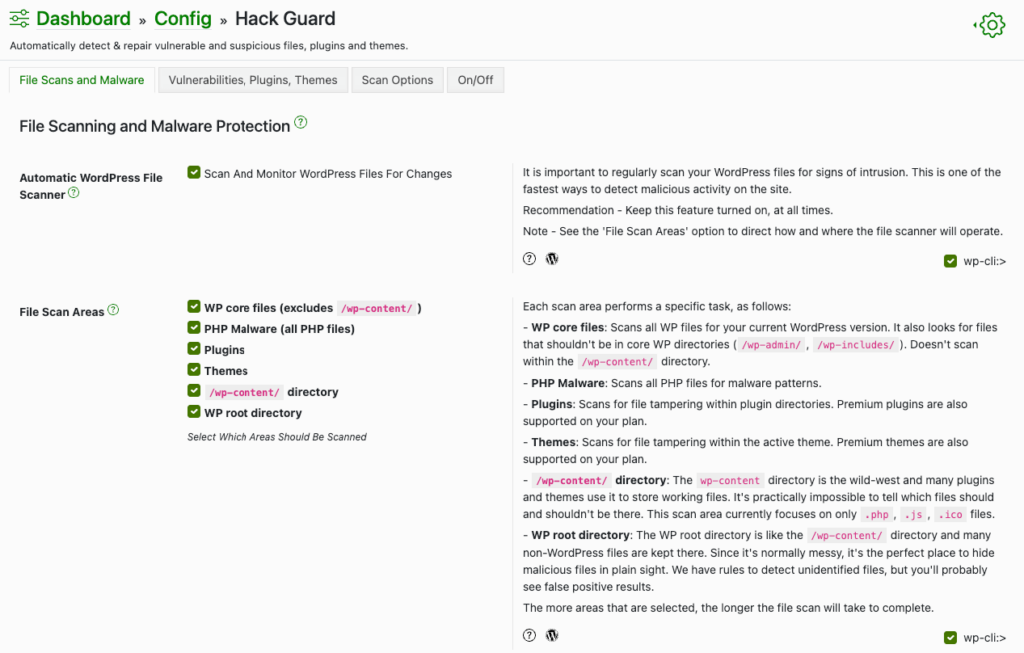
You can also use a security plugin with a malware & file scanner, like Shield Security PRO. This will help pinpoint altered files quickly, focusing your search directly on malware locations.
After you’ve reviewed the WordPress files, access Google Search Console to look for any suspicious links. Disavow any spammy or malicious links that may be harming your website.
Finally, analyse your hosting server logs by going through the following steps:
- Access server logs: Log in to your hosting control panel and locate the server logs section.
- Review access logs: Scan for entries with unusual IP addresses, times, or high frequency of requests.
- Identify error logs: Look for frequent 404 errors or unauthorised access attempts.
- Spot patterns: Notice patterns like repeated access attempts from the same IP or suspicious user agents.
- Take action: Block suspicious IPs and tighten security settings based on your findings to prevent future breaches.
⚠️Remember to document the entire process and results. Keeping detailed notes helps you understand the scope of the attack and guides your next steps towards removing the hack.
Step 2: Removing the malware
To minimise the damage and begin recovering your WordPress site, you need to remove this malware as quickly as possible. There are several ways to do that: manually, by hiring a professional, or with a plugin. Your choice depends on your technical expertise and how confident you are at handling the removal process.
An important first step is checking whether you have recent backups of your site. If so, you can restore the site to an earlier version to eliminate injected/malware code. This step is particularly useful if you can confirm that the hack occurred recently and the backup predates the hack. To prevent further issues, perform this restoration in a test environment first, ensuring no other site elements are affected.
If that’s not possible, you’ll need to try one of the following techniques:
Removing the malware manually
Keep in mind that this is a difficult process and requires specialised knowledge. It’s easy to mistake a legitimate change from a theme or plugin for malware, and removing it may cause unforeseen damage to the site.
- Often, malware will be in recently modified files. Use an SFTP client to look at modification dates, or use a command like find in SSH to locate recently changed files.
- Use phpMyAdmin to access your database and look for any suspicious content, especially in the wp_options, wp_users, and wp_posts tables
- wp_options stores most of the site-wide settings for WordPres, including URLs, theme settings, and plugin configurations. Malware or malicious scripts inserted here can affect the entire site, redirect users, insert spammy links, or change critical settings.
- wp_users contains information about every registered user, including usernames, hashed passwords, and email addresses. Hackers often insert their own admin accounts for uninterrupted backdoor access.
- Lastly, wp_posts can include malicious content, spam, and hidden links injected directly into the content of posts and pages. These can affect your site’s SEO rankings and potentially redirect users to harmful sites.
- Open infected files in a text editor. Look for long, unintelligible code and remove it carefully without affecting the original code. If you’re unsure, replace the infected file with a fresh copy from the original WordPress package or plugin/theme source.
- Check your .htaccess file and restore it to the default WordPress .htaccess settings to make sure it’s clean.
Hiring a professional
Getting rid of a hack manually will involve risks if you’re not 100% confident in your knowledge. In any case, hiring a cybersecurity expert is usually the better option. These professionals have the expertise to quickly identify the source of the breach, efficiently clean your site, and implement stronger security measures to prevent future attacks.
However, there are many scammers out there, so make sure you follow these steps when hiring:
- Check credentials: Look for certifications like Certified Information Systems Security Professional (CISSP) or Certified Ethical Hacker (CEH). These indicate a strong knowledge base and adherence to industry standards.
- Ask the right questions: Inquire about their experience with WordPress and similar cybersecurity issues. Ask for references or case studies demonstrating their effectiveness in resolving such problems.
- Review their approach: Understand their method for cleaning and securing websites. Ensure it aligns with the latest security practices.
Working with a professional will allow you to better understand how the breach occurred and avoid similar incidents in the future. It’s a learning opportunity that enhances your long-term website security.
Using a plugin for malware removal
If you’re looking for an automated solution to malware removal, Shield Security PRO is a great choice. Its user-friendly interface and effective malware detection and removal features ease the recovery process, helping you to quickly retake control.
The platform includes:
- Daily and automated AI scans: The plugin scans your site files daily, comparing them to a clean WordPress installation to detect anomalies. On top of that, the AI-powered scanner MAL{ai} will detect PHP malware in WordPress files that has never been seen before.
- The ability to flag for manual handling: You can choose to add settings that flag the malware, giving you more control over how the issue is handled.
- Automatic malware removal: Infected files are identified and can be replaced with fresh, uncorrupted versions. This ensures that malware is removed as quickly as possible.
It’s crucial to understand that this automated process might affect other aspects of your site. For example, if a plugin, or your developer, has made legitimate changes to a file and it’s replaced with an original version, it will undo those specific changes. If you have any doubts, you should switch-off automatic file repair during scans.
Paul Goodchild, the creator of Shield Security PRO, advises caution:
“Be wary of any plugin that claims it can automatically remove snippets of malware from a file without changing the rest of the file. It’s possible to automatically replace a damaged file with a fresh version, but surgical malware removal – which removes some changes while leaving others behind – must be done by a human being who knows what they’re doing.”
Still, Shield Security PRO is very effective in automated malware removal, as seen in this fantastic review from WordPress user @nregard:
It scans & monitors file changes with automatic removal! Literally the best
I can not say enough about Shield Security’s service and product.
It’s always a big ordeal to maintain the security of my WordPress site, and I have not found a plugin/service that can keep my sites safe, detect file changes & remove them automatically until I found Shield Security.
This plugin literally does it all: If any file is changed or added it notifies you, & with the scanner running every hour, I never miss a malware injection.
It scans and monitors WordPress core files for changes, files for malware infections, and plugin & theme files for changes. THEN you can set it to AUTOMATICALLY delete these unrecognised files. What?!? How perfect is that!
I just went in and removed all my other security plugins (Malcare Pro, Wordfence, Sucuri Pro, Anti-Malware from GOTMLS.NET) because I am so sold on Shield Security Pro.
It literally does everything and can I say that the pricing model is UNBEATABLE!
I also need to mention that their customer support is also literally the BEST that I have ever encountered with any security/any product. I had a big issue I needed hands-on help with and they happily helped me with everything. They are so knowledgeable, down-to-earth, and kind. Such a great experience.
This product has really been a lifesaver: Go try the week free trial or just buy the subscription, it’s a no brainer!
Step 3: Redirecting injected URLs
To identify these unwanted URLs, access your Google Search Console account. Navigate to Pages, then scroll down to find the “Crawled – currently not indexed” category.
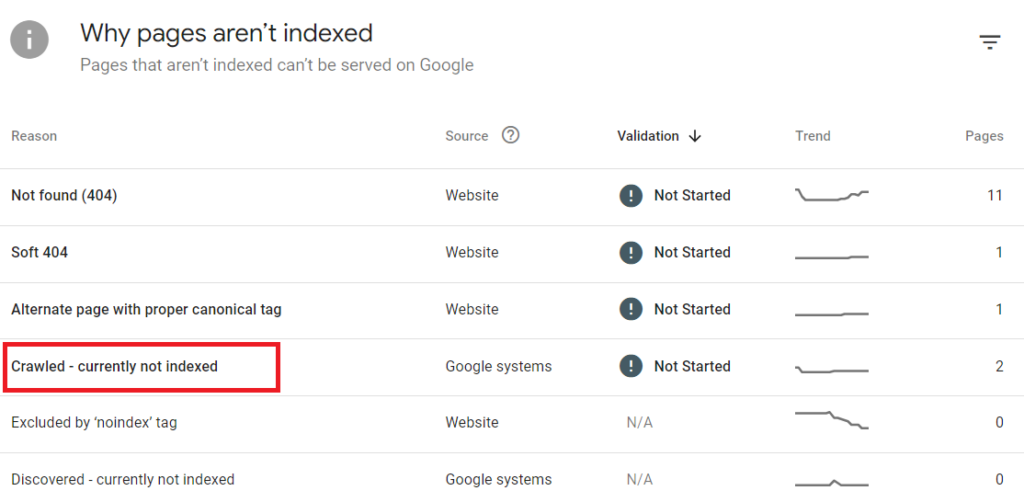
This section often contains URLs with unusual patterns, such as a string of ten letters followed by three numbers, typically ending with an extension like .html.
Once these URLs are identified, it’s important to prevent them from being accessed. You can redirect these SPAM URLs to a 404 error page, which tells users and search engines that the page does not exist. This can be set up using your site’s .htaccess file with the following entries:
RewriteEngine On
RewriteCond %{REQUEST_URI} ^/path-to-spam-page$
RewriteRule ^.*$ - [R=404,L]
Then, replace /path-to-spam-page with the actual path of the spammy URL.
Additionally, to stop search engines from trying to index these directories, update your robots.txt file as follows:
Disallow: /spam-directory/For individual URLs, specify:
Disallow: /spam-URL/Setting up this 404 redirect is crucial. Without it, malware removal or cleanup efforts are only temporary, and the problem could reappear. Redirecting these URLs effectively ensures that the harmful paths are blocked, providing a more permanent solution to the issue.
Step 4: Cleaning up with Google
After resolving the issues caused by the Japanese keyword hack, it’s time to restore your website’s reputation with Google.
Submitting a review request to Google
Submitting a review request will help to remove any associated penalties that are harming your site’s SEO. Here’s how to do it:
- Access Google Search Console: If you don’t have an account, you’ll need to set one up and verify ownership of your website.
- Navigate to Security and Manual Actions > Security Issues: This area will show you any issues Google has detected, including the effects of the Japanese keyword hack.
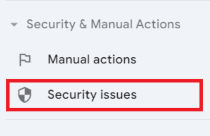
- Request a review: If your cleanup is complete and no issues remain, you can request a review. In the Security Issues section, you should see an option to “Request review”.
- Describe your fixes: Provide a detailed description of what was cleaned on your site and any preventive measures you’ve put in place to prevent future attacks. This information helps Google’s team understand the context and thoroughness of your actions.
Google typically responds to review requests within a few days, but it can take longer depending on the hack’s specifics and the backlog of requests.
During the waiting period:
- Monitor your traffic: Use tools like Google Analytics to keep an eye on your website’s traffic. Check for normal traffic levels and any anomalies that could suggest residual issues.
- Stay alert for messages: Keep checking the message centre in Google Search Console for updates or further instructions from Google. This can be found via the bell symbol in the top right of the screen. Immediate action on any additional recommendations can quicken the recovery process.
Taking these steps and engaging with Google will help to restore your site’s SEO, and get your business back on track.
Requesting removal of spam from search results
You can use Google Search Console to identify and temporarily or permanently remove hacked content from Google’s search results.
To block the SPAM URLs temporarily, do the following:
- Go to the “Crawled – currently not indexed” page where you previously spotted unusual URLs. Export this information as a CSV file for a full list of potentially hacked URLs.
- Access Indexing > Removals in Google Search Console, select the “Temporary Removals” tab, and click “New Request”.
- Input each spammy URL you wish to hide from Google’s search results and its possible variations.
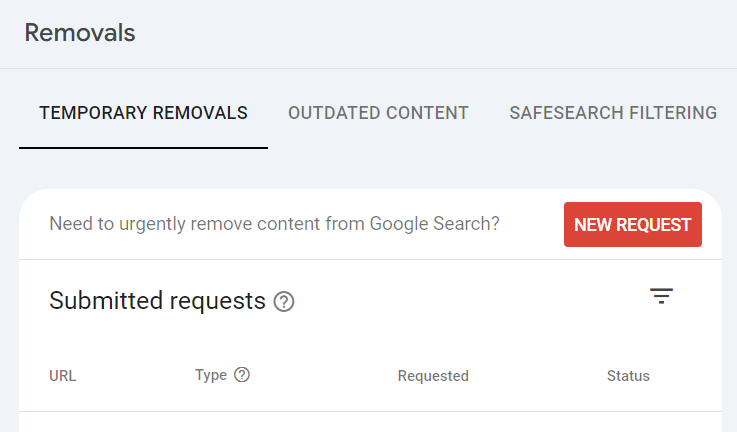
This feature removes URLs from search results for six months, allowing you to fix the underlying security issue without compromising your reputation and rankings. Remember, this removal is temporary and primarily helps prevent users from accessing the hacked content through search.
To permanently remove these URLs, you need to delete the related content from your website, including images, pages, directories, and non-HTML files like PDFs. Then, you need to ensure that the web servers return either one of these HTTP status codes: 404 (Not Found) or 410 (Gone).
After you’ve removed the SPAM URLs, continually check the “Security Issues” section in the Search Console for updates and additional recommendations.
To prevent this hack from happening again, thoroughly clean your site and apply stronger security measures going forward.
Re-indexing your clean site
Once your site is clean from a Japanese keyword hack, the next step is to have Google recrawl and reindex your site to ensure search results display the current, secure content.
To do this, log in to Search Console and submit your sitemap. You can do this via Indexing > Sitemaps. Submitting your sitemap prompts Google to recrawl your website.
Best practices for reindexing:
- Clean content: Before requesting a recrawl, double-check your website to ensure all injected pages are either removed or redirected to a 404 page. This helps Google understand which pages should be dropped from the index.
- Consistent updates: Keep your website’s content fresh and updated. This not only aids a quicker reindexing process but improves your site’s overall SEO health.
- Patience: Remember, reindexing doesn’t happen instantly. It might take some time for Google to fully process your sitemap and recrawl the site. During this period, keep monitoring your Search Console for any further issues or notifications.
Prevent future hacks with Shield Security PRO
Shield Security PRO is the perfect choice for website owners looking to prevent future website hacks. With features like a built-in firewall, bad-bot detection and blocking, and regular malware scanning, it offers a well-rounded security approach that is both proactive and responsive. This means it not only works to keep malware off your site, but provides you with easy-to-use tools to rapidly respond to any security breach.
As with any hack, detecting and removing the Japanese keyword hack is critical if you want to maintain your good reputation. If not addressed promptly, the hack can severely impact your site’s visibility in search. While there are various methods to tackle this issue, choosing the right one depends on your level of expertise.
For those managing their site’s security, Shield Security PRO provides several tools to help:
- Malware scanning: Automatically identifies compromised files, making it easier to pinpoint and address issues.
- Automatic file repair: Replaces affected files that do not include any legitimate modifications, ensuring clean, functional website operations.
- Bad-bot blocking: Prevent future attacks by blocking the kinds of bots most likely to inject malware on your site.
Check out Shield Security PRO today to simplify your WordPress security needs and focus more on what matters – running your site.


