Most WordPress guides treat pingbacks as a simple toggle – just uncheck a box, and you’re done. But if you’ve ever disabled them in your settings, only to find your old posts still getting hit, you know it’s not that simple.
Pingbacks are a relic of an older internet, hijacked today for spam, DDoS attacks, and backlink schemes. And the default WordPress settings don’t fully shut the door.
This guide aims to be more thorough.
We’re taking a three-step approach: First, we’ll configure WordPress to prevent new pingbacks. Then, we’ll deal with existing posts, which remain vulnerable even after you change the settings. Finally – and most importantly – we’ll secure the XML-RPC endpoint, the real weak spot in WordPress’s pingback system.
This won’t be a one-click fix. Expect bulk post modifications, security tweaks, and some server-side adjustments. But the results will be more than worth it.
What’s the difference between a trackback and a pingback in WordPress?
Pingbacks and trackbacks in WordPress both serve as link notifications between blogs, but they function differently under the hood.
Trackbacks are manual – when you link to another blog, you copy a trackback URL and paste it into a dedicated field. If approved, a summary of your post appears on the target blog. The problem with trackbacks is that they’re a spam magnet – exploited for junk links, with little legitimate use left.
Pingbacks, on the other hand, are automated. When you link to another WordPress site with pingbacks enabled, WordPress pings the target site’s XML-RPC endpoint. If approved, the link appears in the comments.
Pingbacks are even worse for security, often used in DDoS amplification attacks. They flood a target with traffic by bouncing requests off unsuspecting WordPress sites.

Trackbacks are obsolete, pingbacks are a security risk, and neither are worth keeping enabled.

Disabling track and pingbacks in WordPress
The first step in turning off pingbacks and trackbacks in WordPress is relatively straightforward:
- From the dashboard, go to Settings > Discussion.
- Under the Default post settings, uncheck Allow link notifications from other blogs (pingbacks and trackbacks) on new posts.
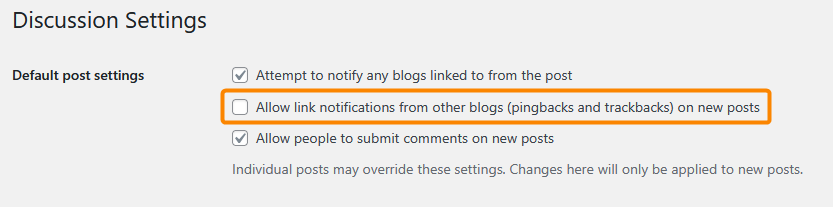
- Save the changes.
You might have noticed the disclaimer below this section that lets you know this is just the beginning.
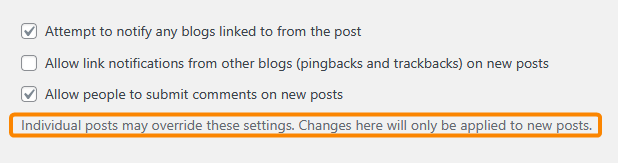
WordPress still keeps the XML-RPC feature active, which means your site can still receive and send pingback requests via, for instance, existing posts.
XML-RPC allows remote connections to your WordPress site, letting other websites and apps interact with it. Hackers take advantage of this by tricking WordPress sites into sending spam or helping with cyberattacks, even after you’ve turned off pingbacks.
For this reason, you also need to block XML-RPC to fully stop your site from being misused. You can do this by adding the following to your site’s .htaccess:
<Files xmlrpc.php>

order deny,allow

deny from all

</Files>
Alternatively, if you don’t want to deal with the issues that come with editing your site files manually, you could use a security plugin like Shield Security PRO:
- Install and activate the plugin.
- From your WordPress dashboard, go to ShieldPRO > Security Zones then click the gear icon next to Bots & IPs.
- Go to the tab labeled Bot Actions then choose your preferred method of dealing with XML-RPC access attempts. You have several options here, from incrementing an offence counter to instant IP blocking.
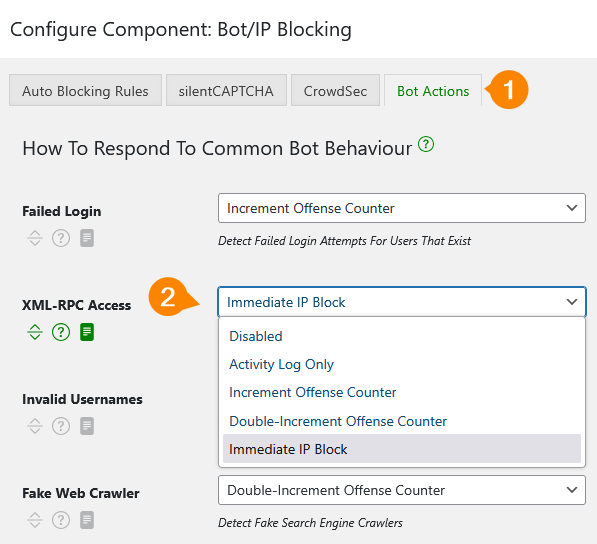
- Save your settings.
This will prevent all XML-RPC access to your WordPress site, meaning bad actors can’t exploit pingback vulnerabilities via older posts.
Disabling WordPress pingbacks for individual posts
WordPress also gives you the tools to turn off pingbacks for individual posts, as opposed to doing it globally, if you want that level of control.
The first method requires you to go through the editor, where you can only do one post at a time:
- With the post editor open, find Discussion on the menu on the right. If you can’t see it, make sure you’re looking at the Post tab.
- Click on Open and uncheck Enable pingbacks & trackbacks. When you uncheck the option, the Discussion settings change from Open to Comments only.
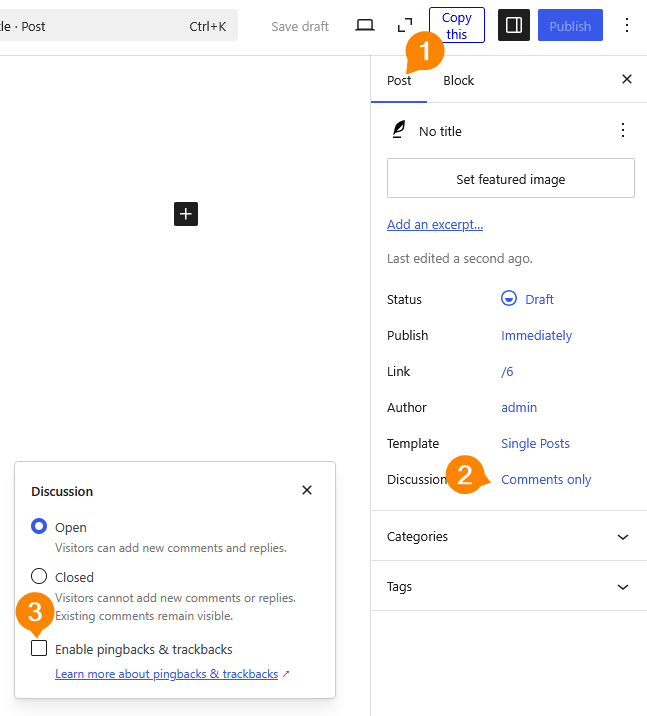
- Save your changes.
This process is slow and not ideal for a site with more than a handful of posts. Luckily, the bulk editor exists:
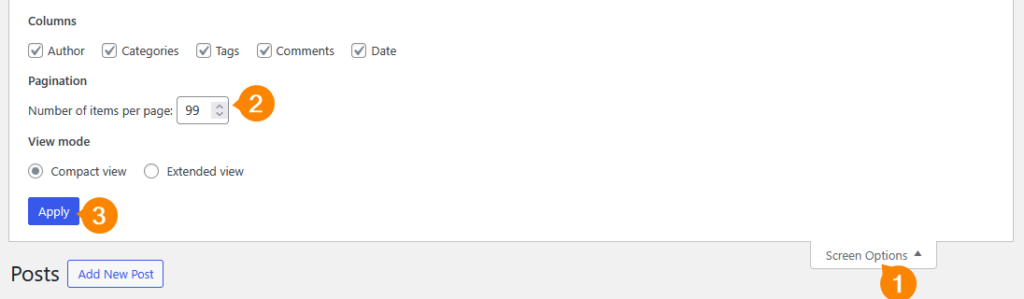
- From the dashboard, go to Posts. If you want to select more posts than are visible on the page, open Screen Options from the top right and set the Number of items per page value as high as needed then click Apply.
- Select the posts on which you want to turn off pingbacks.
- From the Bulk actions dropdown, choose Edit, then click Apply.
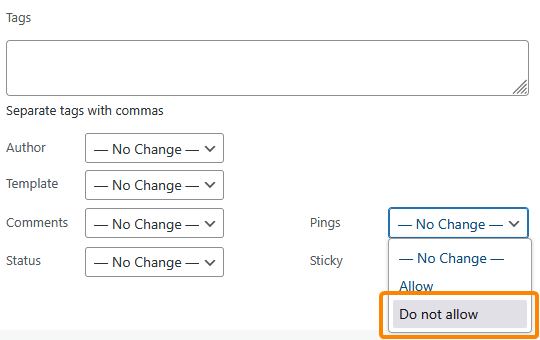
- In the settings that appear, choose Do not allow from the Pings dropdown.
- Click Update to apply the changes to all selected posts.
How to disable self-pingbacks on your WordPress site
Self-pingbacks happen when you link to your own posts within your content, and WordPress treats them like external pingbacks. They can clog up your comments section while looking just as spammy as external pingbacks, so turning them off makes sense.
The easiest way to do this is by omitting your domain name from the URL when creating internal links. For example, if you’re linking to https://yourwebsite.com/2025/01/05/a-new-year, only use /2025/01/05/a-new-year. WordPress will automatically recognise this as an internal link and direct readers and search engines accordingly.
If you’re worried you might forget to do this, you can automate the process using a plugin like No Self Ping. Installing and activating the plugin will automatically exclude pings from your website.
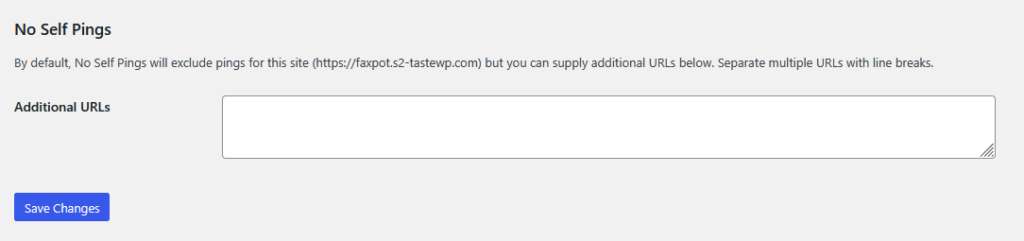
You can also go to Settings > Discussion and scroll to the bottom, where you’ll find a new No Self Pings section, where you can add other sites to ignore pings from.
Start your Shield Security PRO journey today
Pingbacks might seem like a harmless WordPress feature, but they open your site to spam, DDoS attacks, and unnecessary bloat in your comments section.
You can disable them through WordPress settings, with custom code, or by using plugins.
Shield Security PRO goes further, not just turning off pingbacks but also blocking XML-RPC entirely, ensuring old posts can’t be exploited either.
Beyond pingbacks, Shield Security PRO’s proprietary silentCAPTCHA technology analyses visitor behaviour to distinguish between legitimate users and bots, effectively blocking malicious automated submissions without disrupting genuine user engagement.
Spam isn’t limited to comments; contact forms are also frequent targets. The plugin’s anti-bot measures mean it also protects contact forms from spam, ensuring that your site’s communication channels stay focused on real discussions, not junk interactions.
And it doesn’t stop there – firewall-level threat detection, automatic malware scanning, and brute-force login protection make it an all-in-one security powerhouse.
If you want a WordPress security plugin that does more than just safeguard your comments section, check out Shield Security PRO and take full control of your site’s security!