WP-CLI for ShieldPRO has been a long-awaited feature for many clients. With v9.1 we’re introducing beta-support for WP-CLI.
With WP-CLI you’ll perform many common actions of the ShieldPRO plugin just as you would with the point-and-click UI.
This article will outlines the functionality you can expect with ShieldPRO 9.1.
First-up, what is WP-CLI anyway?
What Is WP-CLI And Why Would You Want To Use It?
WP-CLI is the primary (if not the only) command-line interface for WordPress. It lets you install and activate plugins, manage comments, import/export, perform actions on media, manage users, and much more.
If you’re not familiar with what “command-line” is, it’s an alternative interface to your WordPress site without the pretty Graphical User Interface (GUI).
For example, to install a WordPress plugin, normally you wouldn’t need to login to your WP Admin area, click to ‘Add New’, search for the plugin, install it, activate it etc.
But with WP-CLI, you can do all of that within a few seconds using a single command from the console.
wp plugin install wp-simple-firewall –activate
It’s clearly much faster this way, but by-far the biggest advantage to WP-CLI is automation.
If you’re regularly setting up new WP sites for your clients, and you have a standard set of plugins you like to use, you can create and automatically run a script that’ll do many the things you need, in just a few seconds.
The scope for time-saving and automation is immense.
We’ll not go into depth about how to setup WP-CLI on your site, as there are many resources for that already. If you read our article outling the infrastructure we use to setup WordPress sites, you’ll remember we mentioned ServerPilot for server management. WP-CLI comes pre-installed automatically for all WordPress sites created using ServerPilot.
What WP-CLI Support Means For ShieldPRO
Shield 9.1 is the first version to open-up a WP-CLI interface for managing the Shield Security plugin.
We’re tagging it with the beta label for now because it’s new and relatively immature. By immature we don’t mean it doesn’t work – just that the commands you use may change as we hone our own WP-CLI code.
Please understand that, if you decide to use our WP-CLI for Shield, you commit to keeping up-to-date with our developments and adjusting any automation scripts as required.
We’ll try to keep major changes to a minimum.
So what sort of things can you expect to be able to do with our WP-CLI integration?
Understanding Shield’s WP-CLI Integration
If you’ve used ShieldPRO for a while, you’ll understand it’s split-up into “features”. Each feature is dedicated to performing certain tasks.
For example, there’s the Scans & Integrity responsible for scanning your site, and repairing any intrusions it finds.
And then there’s the WP Activity Log feature for tracking and logging events.
You can think of each feature as both a set of configuration options, and then their own set of feature-specific functions. So for Shield’s WP-CLI, there are 2 main types of commands:
- Feature management (common to every feature)
- Options setting and getting;
- Enabling/disabling features.
- Performing feature-specific actions, such as import/export, forceoff, etc.
The 1st command type is straightforward. You specify the feature you’re controlling, the option you want to set (or get) and the value you want to set it to.
The 2nd command type is more varied and depends on the action you’re performing. Each action is housed under a particular feature and familiarity with ShieldPRO and its features will help you work out which feature you’ll want to use.
To help you get an idea, here are some simple examples to demonstrate the 2 types of commands.
Examples 1 & 2 are commands that are common to all features – i.e. getting and setting option values.
Example 1: (Type 1) Get the current Shield Report email address
The following command will request the value of an option (using its key):
wp shield plugin opt-get --key=block_send_email_address
The output will be something like this:
Current value: [email protected]
Or, if you provide an option key that doesn’t have a value set:
No value set.
Or, if you provide an option key that doesn’t exist for this feature:
Error: Parameter errors:
  Invalid value specified for 'key' (The option key to get.)
We ensure results and errors are as clear as possible, letting you know what might have gone wrong.
Let’s take a look at how to set an option value.
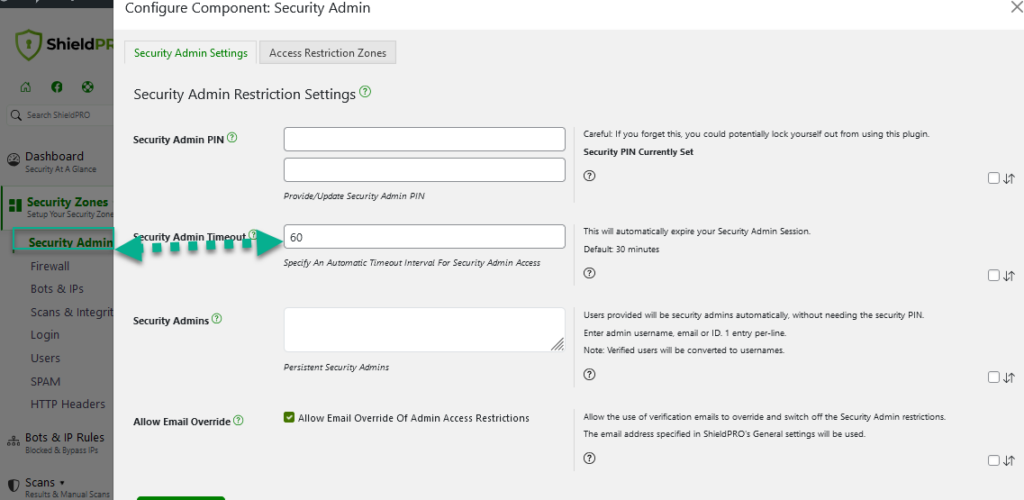
Example 2: (Type 1) Set the Security Admin timeout
The following command sets the Security Admin timeout to 60 seconds.

This command is equivalent to opening up your standard Shield Security GUI, going to the Security Admin feature, and entering 60 in the Security Admin timeout section. (See below)

Example 3: (Type 2) Export settings to a file
This example is one of the Type 2 commands – a custom-built command to perform a function specific to a feature.
The import and export of ShieldPRO configuration is done through the plugin feature. Here is the command to export the current ShieldPRO configuration to a file.
wp shield plugin export --file="./shield-export.json"
As you can see here, it’s going through the plugin feature and the subcommand is export.
With most commands, there particular arguments required. In this case, it’s the path to the export file you’d like to use.
In the case of this command you can use an absolute path, or a path relative to your WordPress’ ABSPATH (which is where your wp-settings.php file is stored).
Example 4: (Type 2) Set a new Security Admin PIN (key)
The Security Admin PIN/Key is stored as a simple MD5 hash. You can’t use the command in Example 2 (above) to set the option value directly (unless you intend to provide an MD5 hash of the PIN you’d like to use).
Instead, we’ve provided a Type 2 command to set this PIN for you. Here it is:
wp shield secadmin pin --set="my-secret-pin"
The WP-CLI response to this is:
Success: Security admin pin set to: "my-secret-pin"
At the same time, you’re able to remove your PIN using:
wp shield secadmin pin --remove
How To Discover All Available WP-CLI Commands
When you’re working with WP-CLI you’ll have to main questions:
- What are all the WP-CLI commands available?
- What options and parameters are needed for each command?
Luckily WP-CLI allows us, as developers, to provide the extra information you’ll to describe commands. You can look up this information from within WP-CLI itself.
There are a few ways to go about this (as our implementation matures, this will also improve).
Question: Which Shield features are available for WP-CLI access?
There are 2 ways to approach this. You could use the built-in WP-CLI help command, or start calling commands incompletely. Using the 2nd approach, if we simply enter:
wp shield
it yields the following response:

This lists all the direct subcommands to the main WP-CLI shield command. In this case, you’ll recognise Shield’s core features in this list.
If we do the same, but instead with the IP feature sub-command:wp shield ips
We’ll see that the following sub-command is available:
wp shield ips ip-add --ip=<ip> --list=<list>
WP-CLI will outline the command and the arguments that it takes – in this case the arguments are ip and list.
But if we want to know more about this command, we can query the help information by using the WP-CLI help command, followed by the full command that we want to know more information about:
wp help shield ips ip-add
The output from this help query is as follows:
This details the structure of the command, its description, the arguments it takes, and what values the arguments can take (if they’re limited to certain possibilities). In this case, the list argument can only take 2 possible values – the white list, or the black list.
It follows then, that the full command to add the IP address 1.1.1.1 to the white-list would be:
wp shield ips ip-add --ip=1.1.1.1 --list=white
We’ve provided clear errors when the commands go wrong, for whatever reason. Take the next 2 commands and their responsese as examples:
wp shield ips ip-add --ip=123.234.456.678 --list=white
> Error: IP address isn't valid.
wp shield user_management session terminate --username=admin
> Error: Couldn't find that user.
More To Come For WP-CLI
This article doesn’t document all the available commands, we’ll have that ready for the ShieldPRO 9.1 release.
And there will of course be additions to our WP-CLI implementation over time.
Comments, Suggestions and Feedback
We hope that the introduction of WP-CLI will help many site owners with ShieldPRO admin tasks, helping you to setup new WordPress sites on Shield quickly, and manage their settings more efficiently than ever.
We’ve covered a lot in this article, but we’ll have more details as we get closer to the ShieldPRO 9.1 release. If you have suggestions or feedback on what you’ve seen so far, please do let us know in the comments section below.


