HTTP headers are quiet, but commanding – small pieces of metadata that shape how browsers interact with your site. They can dictate content behaviour, block malicious activity, and fine-tune user experiences. In web security, headers are less about decoration and more about control, establishing rules that safeguard interactions without users typically noticing.
Take X-Frame-Options: a single header that punches far above its class by preventing clickjacking attacks. It stops attackers from embedding your site in iframes to trick users into harmful actions. For WordPress users, whose sites are often high on attackers’ list for opportunistic exploits, this type of security layer offers an extra degree of control.
And while web security is increasingly shifting toward more comprehensive solutions like Content Security Policy (CSP), X-Frame-Options still serves a purpose. It’s straightforward, widely supported, and often the first defence for older themes and plugins that don’t play nicely with newer security standards.
Headers aren’t glamorous, but they’re the quiet, decisive mechanisms that make your site less of a target. It’s time to get acquainted with them!
The past, present, and future of X-Frame-Options in WordPress security
Introduced in the late 2000s, the X-Frame-Options HTTP security header emerged as a response to clickjacking – a technique where attackers load a legitimate website into an invisible iframe to trick users into interacting with it. By allowing developers to specify whether their site could be embedded in iframes and under what conditions, X-Frame-Options offered a straightforward way to block unauthorised framing and reduce this attack vector.
Despite being considered a “legacy” header today, X-Frame-Options remains widely deployed, particularly on WordPress sites where quick security fixes are often needed. It’s simple to implement and compatible with most browsers, making it a staple for protecting sites with older themes and plugins.
However, its limitations are notable: it doesn’t support granular controls or multiple rules, and it’s incompatible with some modern browser behaviours, requiring additional layers like CSP for comprehensive protection.
With the rise of CSP and its more flexible frame-ancestors directive, X-Frame-Options is gradually being overshadowed. CSP allows developers to define nuanced embedding rules, offering a modern alternative that aligns with today’s complex web security needs.
Still, X-Frame-Options retains value for backward compatibility with older browsers and environments, ensuring it won’t disappear entirely just yet. Its legacy is a reminder of security’s iterative nature – each tool a stepping stone towards stronger, more adaptable standards.

Choose the right X-Frame-Options directive
X-Frame-Options offers three directives, each controlling iframe behaviour differently:
DENYprevents all iframe embedding, providing the highest level of restriction.SAMEORIGINallows embedding only when the content is loaded within the same origin (protocol, domain, and port).ALLOW-FROM, while technically offering selective embedding for trusted domains, is limited due to browser support and implementation challenges.
The best directive for your site depends on whether it’s open to embedding or strictly locked down:
- Use
DENYon sites that should never be embedded, such as admin panels or pages with sensitive user information, like on banking dashboards to prevent phishing. It provides the strongest level of security by preventing all iframe embedding, making it a clear choice for maximum restriction. - Use
SAMEORIGINfor sites that need to embed their own content while blocking external domains. It’s useful for WordPress sites that load internal content in iframes, like an e-learning platform displaying course videos. - Use
ALLOW-FROMwhen embedding needs to be permitted from specific external domains, such as permitting a payment processor’s domain to embed a checkout iframe. It’s rarely used due to limited browser support, requiring fallback strategies for compatibility.
Most WordPress sites benefit from DENY for secure content or SAMEORIGIN for flexibility. For specific cases requiring external embedding, ALLOW-FROM is an option but often better handled with CSP for broader support and control.
Simplifying X-Frame-Options with Shield Security PRO
Without X-Frame-Options, your site could be embedded into malicious iframes, tricking users into actions they didn’t intend. But configuring this isn’t exactly straightforward unless you like poking around in server settings or writing custom code. Enter Shield Security PRO, a WordPress plugin that takes the headache out of this process.
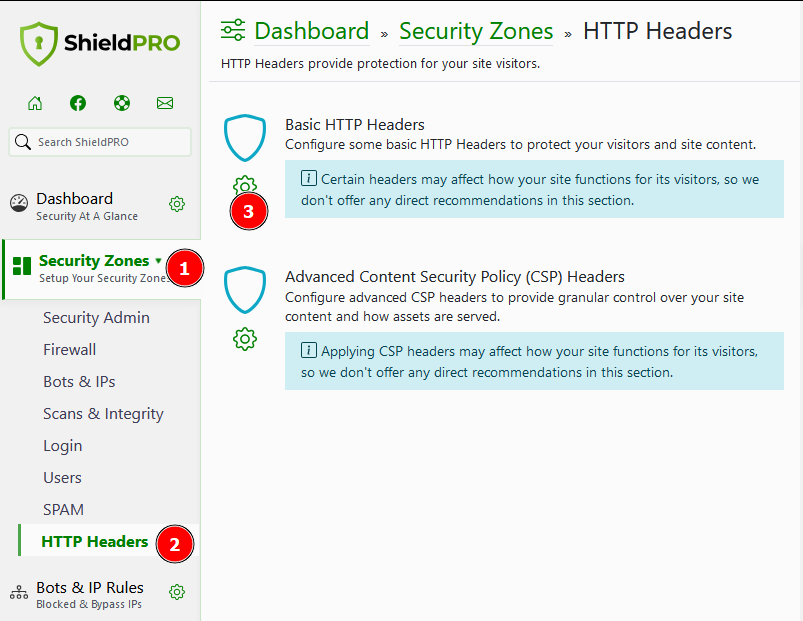
Shield Security PRO’s HTTP Headers feature makes setting up X-Frame-Options (or Block iFrames, as it’s labelled in the UI) absurdly simple:
1. From the dashboard, expand the Security Zones section.
2. Go to HTTP Headers and click the gear under Basic HTTP Headers.

3. Choose your preferred setting from the Block iFrames section. Your options are as shown below:

4. Click on Save Settings when you’re done.
This simple process automates what used to require manual coding or complex server tweaks. This is both convenient for site owners who don’t have the time or expertise to fiddle with configurations.

Beyond X-Frame-Options, Shield Security PRO offers a suite of tools for implementing other security headers. For instance, XSS Protection tells compatible browsers to block anything they determine to be reflective cross-site scripting attacks. You also get access to advanced custom CSP header rules, which give you granular control over which resources can load on your site, blocking unauthorised scripts and assets.
Together, these headers create a layered security approach, closing off multiple attack vectors that could otherwise exploit your site.

Implementing X-Frame-Options manually
Of course, there’s always the option to add X-Frame-Options to your site yourself, in which case you have three ways of doing it:
The walkthroughs in this section use SAMEORIGIN, but you can replace it with DENY to block all iframes or ALLOW-FROM <URL> to allow a specific domain.
1. Using .htaccess
The .htaccess file is a configuration mechanism used by Apache web servers to control various aspects of site functionality, including redirects, access rules, and performance optimisations. You can edit it to tweak core site settings at a high level, as long as you create a backup beforehand.
To configure X-Frame-Options using .htaccess, follow these steps:
- Open your .htaccess file and insert the following block to add the directive:
<IfModule mod_headers.c>
Header set X-Frame-Options "SAMEORIGIN"
</IfModule>
- Save the changes and upload the updated .htaccess file to your server’s root directory.
- Use a tool like Security Headers Scanner to confirm the header is properly set.
- Ensure the
mod_headersmodule is enabled. If the header doesn’t apply, check for conflicting directives in other configuration files.
2. PHP implementation
To set X-Frame-Options in PHP, add this directive to the top of your PHP script:
header('X-Frame-Options: SAMEORIGIN');
For WordPress, use the following hook in your theme’s functions.php file:
add_action('send_headers', function() {
	header('X-Frame-Options: SAMEORIGIN');
});
To prevent conflicts, ensure no other plugins or server rules are adding the header with conflicting values. Use tools like browser developer tools to check for duplicates.
For page-specific implementation, add conditional logic in your PHP script or WordPress hook to target specific pages.
3. Server configuration method
To add X-Frame-Options via server configuration, start by specifying the directive in your server’s configuration files:
- For NGINX servers, add the following line to your NGINX configuration file, typically under the server block:
add_header X-Frame-Options "SAMEORIGIN" always;
- For Apache, the .htaccess method outlined above works, but you could also try including this in your virtual host configuration file:
Header set X-Frame-Options "SAMEORIGIN"
Ensure the header isn’t already set by another configuration or application to avoid conflicts. Use the Security Headers Scanner mentioned previously to confirm proper implementation. If issues arise, check for duplicate headers or module compatibility (e.g., mod_headers for Apache).
Testing and troubleshooting your X-Frame-Options setup
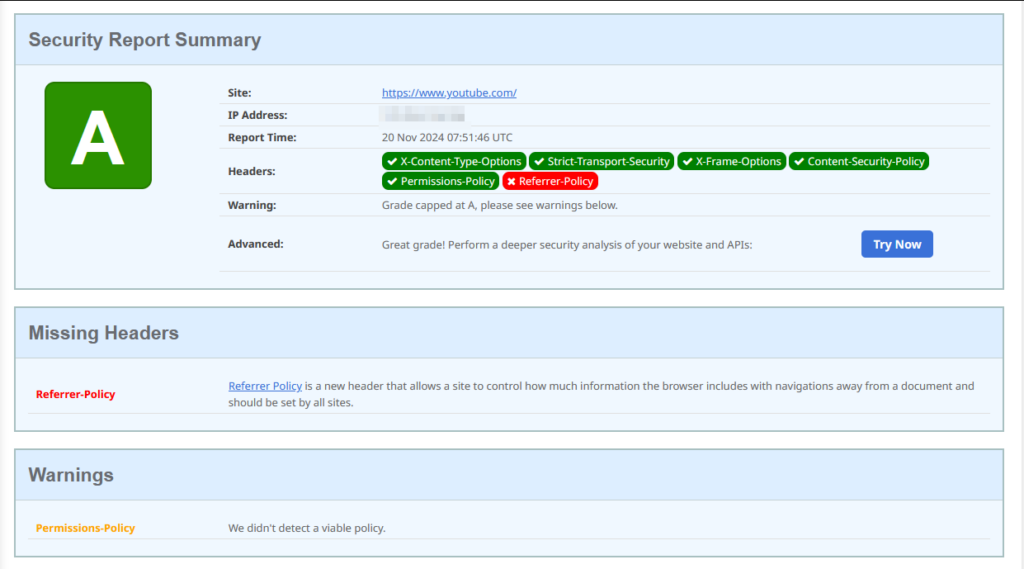
Testing X-Frame-Options starts with security header scanners to confirm implementation and identify misconfigurations. Here’s an example of a Security Headers report for YouTube.com:

Advanced challenges include conflicting headers from plugins, server settings, and WordPress itself. Duplicate or mismatched directives can break functionality or render protections ineffective.
To troubleshoot these issues, start by centralising header control – prefer server-level headers for consistency, but ensure application-level settings aren’t being overridden. If legitimate iframe use cases fail, switch to ALLOW-FROM <URL> to allow specific origins.
For subdomains, explicitly set headers for each configuration to avoid inheritance issues that leave gaps in security.
Performance is another factor: server-level headers apply faster but lack flexibility, while application-level headers add control but can introduce latency. Address conflicts by reviewing all sources of headers – plugins, themes, and server rules – and testing changes methodically.
Proper testing ensures X-Frame-Options work as intended without breaking legitimate functionality.
X-Frame-Options vs. Content Security Policy: Understanding modern security headers
X-Frame-Options and CSP approach security from different angles.
X-Frame-Options focuses narrowly on iframe embedding, offering simple directives like DENY, SAMEORIGIN, and ALLOW-FROM.
CSP, on the other hand, is a multipurpose header, capable of governing content sources for scripts, styles, images, and framing via its frame-ancestors directive.
This makes CSP far more flexible and powerful, allowing administrators to define granular rules for a wide range of security needs.
X-Frame-Options works well in scenarios where iframe control is the sole concern, particularly for WordPress users needing quick solutions. It’s straightforward to implement and compatible with older browsers, making it a practical choice for blocking clickjacking on admin panels, login pages, or sensitive sections of a site.
CSP’s frame-ancestors directive shines when more detailed control is required. It allows you to specify multiple trusted sources for embedding, catering to complex setups like multi-domain platforms or sites integrating with third-party services.
Beyond iframes, CSP protects against script injection, data leaks, and other modern threats.
For layered security, X-Frame-Options and CSP can complement each other. Deploy X-Frame-Options for legacy browser compatibility, while CSP handles advanced configurations.
Together, they offer both simplicity and sophistication in web security.
Elevate your WordPress security: Get started with Shield Security PRO
Modern WordPress security demands more than manual tweaks and piecemeal solutions. Shield Security PRO simplifies security header management, including X-Frame-Options, by automating configurations that would otherwise require deep technical know-how.
But it doesn’t stop there – the plugin integrates this with its broader security ecosystem, offering features like network-wide threat detection to counter emerging header-based attacks.
Our HTTP Headers feature is part of a complete protection package that includes advanced tools like MAL{ai}, which detects malicious activity, and silentCAPTCHA, which prevents bot-driven exploits. These features work alongside security headers to provide layered, intelligent protection for your WordPress site.
As cyber threats evolve, relying solely on manual configurations is no longer enough. Shield Security PRO delivers automated, cutting-edge security to stay ahead of attackers. Ready to secure your website the right way? Explore our plans!

