Crashed and unresponsive websites, cybercrime hacks, or other data loss may leave you needing to recover your WordPress site. Here we’ll focus on the methods available for database restoration, from plugins to using phpMyAdmin or your host’s control panel.
Before diving in, ensure you have the necessary technical elements to hand:
- Your database credentials.
- Access to phpMyAdmin or cPanel.
We’ll explore restoration methods from the least to most complex, covering configuration and checks to ensure your site remains secure. Come the close, you’ll be able to choose the approach that best suits your comfort level – and never have to worry about WordPress recovery again!
Quick database restoration guide: Choose your method
When it comes to restoring WordPress with a database backup, your specific situation will dictate the best approach to recovery. If you haven’t already done so, consider the best backup strategy in terms of regularity and storage, and base your chosen method on three key factors:
- Time constraints: If you need a quick fix and don’t have confidence in coding, a backup plugin offers the simplest restoration method.
- Access level: If you have direct FTP or SSH access, you can use phpMyAdmin for a hands-on approach. If you only have hosting panel access, stick with the control panel options.
- Database size: Larger databases may exceed upload limits in phpMyAdmin. If your backup file is substantial, using your hosting control panel is advisable.
For each scenario, here’s your best option:
- Need for speed and simplicity: Restore from a backup plugin.
- Limited access and large database: Use the hosting control panel.
- Full access and technical comfort: Go for the direct phpMyAdmin method.

Before starting any restoration process, don’t forget to check the integrity of your backup file. Automated tools can also timeout with databases of 20MB+, so close all other admin sessions during restoration to prevent conflicts.
Option 1: Recover WordPress with a plugin: ShieldBACKUPS
The easiest method of backing up WordPress is to use a tool – a quick online search will introduce you to a number of backup plugins. For convenience, we’ll demonstrate using the one we know best – ShieldBACKUPS. This is a nifty add-on integrated with our Shield Security PRO plugin.
Designed specifically for WordPress, users are able to recover their sites with just a few clicks – how’s that for convenience! Key features include:
- The ability to test and verify backup images
- Rapid backups that complete in just a few minutes.
- A true disaster recovery solution, with backups stored offsite, 100% independent from your WordPress website.
- There’s no need for technical skills whatsoever.
Automating backups is easy with ShieldBACKUPS – just take the following steps:
- Log in to your ShieldPRO account here.
- Navigate to your Sites Manager page and click a button to enable ShieldBACKUPS for your site.
- Once enabled, ShieldBACKUPS automatically backs up your site daily, including both files and the database.
To recover your WordPress site using ShieldBACKUPS, follow the automated restoration process outlined in this guide here.
It’s also worth considering a regular database cleanup as part of your site maintenance program. This will remove redundant files and ensure that you’re only keeping the data you need.
Option 2: Restoring via phpMyAdmin
Restoration via phpMyAdmin can be likened to ‘digital archaeology’, where each backup tells a story of your site’s evolution. However, this process requires careful attention to avoid minor corruptions that can lead to major issues.
But first things first! To restore via phpMyAdmin, you’ll need to have manually backed up your database first. Use the method below for manual backups – this process can also be followed when backing up via cPanel (see Option 3, below):
- Access your hosting provider’s control panel by entering your credentials.
- In the dashboard, scroll down to the Databases section and select phpMyAdmin.

- In phpMyAdmin, find your WordPress database listed on the left side and select it.
- Select the Export tab at the top of the page. You’ll see two export methods: Quick, and Custom. For a simple backup, select Quick.
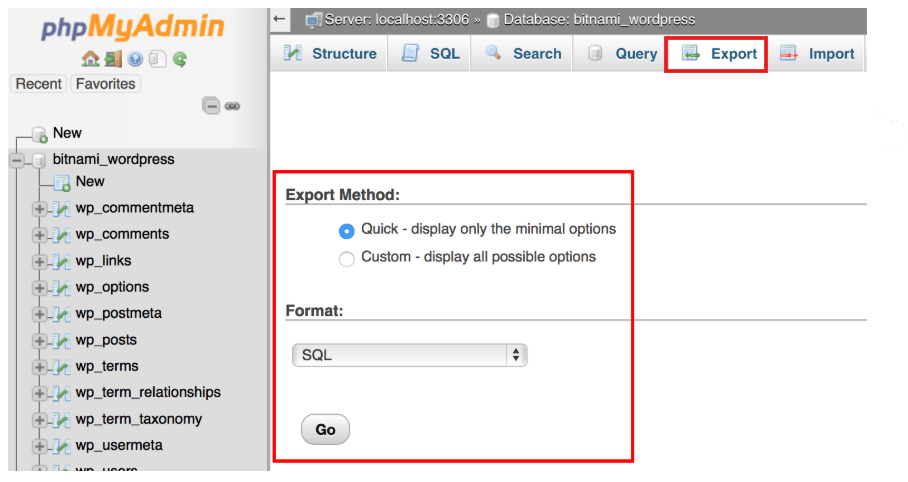
- Ensure that the format is set to SQL, which is the standard format for database backups.
- Select the Go button to generate a .sql file of your database, which will automatically download to your computer.
- Save the downloaded SQL file in a secure location on your computer for future use.
Restoration is a little more complex!
Start by managing the character set and collation during import. Ensure you select the correct settings, typically utf8mb4 for modern WordPress installations, to prevent data corruption.
If you’re dealing with oversized SQL files, compress the files into .zip format. This can help bypass upload limits imposed by your hosting provider.
Common import errors include timeout issues, memory limits, and permission problems. To resolve these, increase the max_execution_time, memory_limit, and upload_max_filesize in your php.ini file. If phpMyAdmin still struggles with large files, using the command line for import may be more effective.
During restoration, be aware of database table prefix modifications. If your backup uses a different prefix than your current setup, you’ll need to adjust this in both phpMyAdmin and your wp-config.php file. Follow this process for restoration via phpMyAdmin:
- Ensure you have a backup of your current database in case you need to revert changes.
- Log into your hosting account’s control panel.
- Look for the phpMyAdmin icon in your control panel and select it. This tool allows you to manage your MySQL databases.
- In phpMyAdmin, locate the left sidebar where your databases are listed. Click on the name of the database that corresponds to your WordPress installation.

- If you want to completely replace the existing database with the backup, you may need to drop all current tables:
- Click on the Check All checkbox at the bottom of the list of tables.
- From the With selected: dropdown menu, choose Drop and confirm the action. Note: This action is irreversible and will delete all data in those tables.
- Select the Import tab located at the top of the phpMyAdmin interface.

- Select Choose File and navigate to where your backup file (in .sql format) is stored on your local computer.
- Ensure that the format is set to SQL in the dropdown menu.
- Select the Go button to initiate the import process – this may take some time!
- Wait for a Success message, indicating that the import has worked.
Once complete, check your WordPress site to ensure that it’s functioning as expected. You may need to clear your browser cache or refresh your website:
- Check for missing tables or corrupted data.
- Pay special attention to serialised data issues, especially after domain changes.
- Use tools like WP-CLI or a specialised plugin to fix these issues without corrupting your database.
Option 3: Restoring via cPanel
The cPanel restoration option is a straightforward process, but it requires attention to detail to ensure everything goes as planned. First up, you’ll need to have backed up your database through cPanel – refer to the step-by-step found in Option 2 for manual backups.
When it comes to restoration, be aware of the following before starting on our step-by-step process.
Begin by navigating to the phpMyAdmin section within cPanel. If your database is large, be aware of the import size limits imposed by your hosting provider. If your SQL file exceeds these limits, consider compressing it into a .zip format before uploading. This can often help bypass size restrictions during the import process.
As you prepare for the import, pay close attention to table collations and character sets. As with the phpMyAdmin method, selecting the correct settings – typically utf8mb4 – is essential to prevent encoding issues that could corrupt your data.
If you are restoring to a different domain, be aware of potential serialized data conflicts. Serialised data can break if the character count changes during a find-and-replace operation.
Before proceeding, verify that the table prefixes in your backup match those in the target database. Mismatched prefixes can lead to errors and incomplete restorations.
To mitigate timeout issues caused by large databases, consider increasing the max_execution_time in your cPanel settings or splitting your SQL file into smaller chunks for easier handling.
Here’s a simple guide to the restoration process:
- Navigate to your cPanel login page, typically found at http://yourdomain.com/cpanel. Enter your username and password.
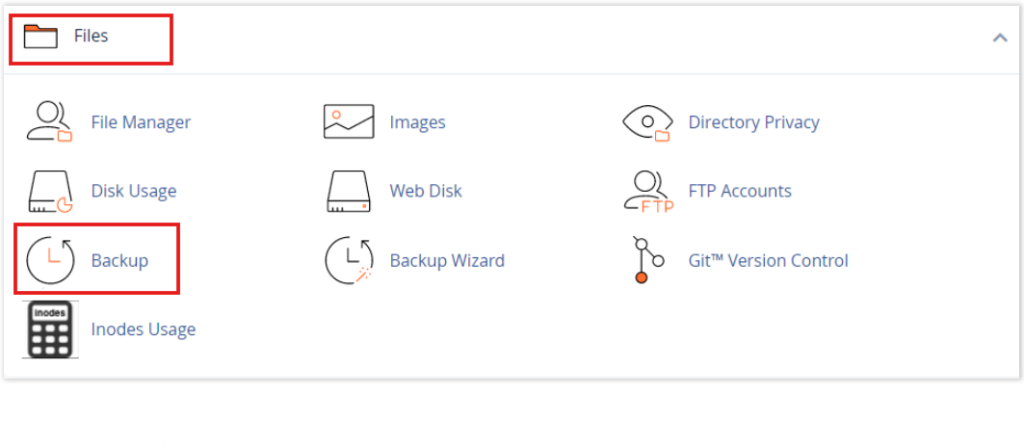
- Navigate to Files > Backup.
- Locate Restore a MySQL Database Backup.
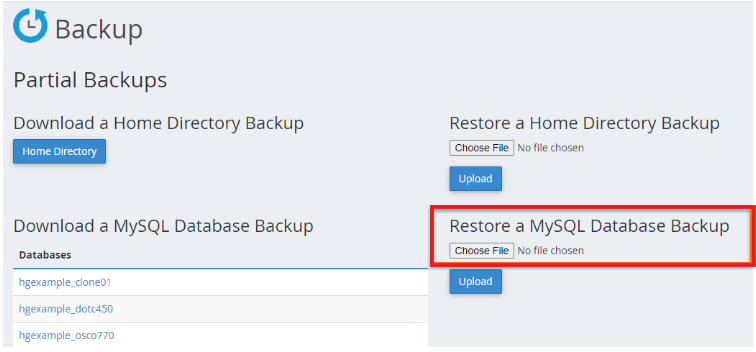
- Select Choose File. This will allow you to select your database backup file (usually in
.sqlor.sql.gzformat) from your local machine. - Select Upload to begin restoring your database from the selected backup file.
- Wait for a Success message to indicate that the database has been restored successfully.
After completing the import, verify that everything has been restored correctly:
- Check for missing tables.
- Ensure all data appears as expected.
- Confirm that links function properly on your site.
Post-restoration troubleshooting guide
No process is without its challenges, so here are a few you may encounter after restoring WordPress with a database backup.
First up, if you encounter MySQL error 1064 – which indicates syntax errors in your backup file – validate the file before importing. Use a text editor to check for misplaced quotes or missing commas that could disrupt the import process.
Next, focus on fixing corrupted serialised data, particularly in the wp_options and wp_postmeta tables. This often occurs during migrations or if the data structure changes. Use specialised plugins or scripts designed to repair serialised data without causing further issues.
If your import is only partially completed, check for max_allowed_packet restrictions. This MySQL setting limits the size of data packets. It can be adjusted in your server’s configuration to allow for larger imports.
When migrating URLs, ensure that both the wp_options table and content tables are updated correctly. This includes changing site URLs and ensuring all links point to the correct domain.
Finally, you may face database user permission conflicts, post-restoration. Ensure that the database user has the necessary privileges to access and modify all tables.
Protect your database with Shield Security PRO
Protecting your WordPress database is no different to a bricks-and-mortar store using an overnight window grille. You’re simply protecting your assets, and saving yourself a potential headache. While restoration is a digital inevitability at some point, reducing the need is a safer, more proactive approach to site management.
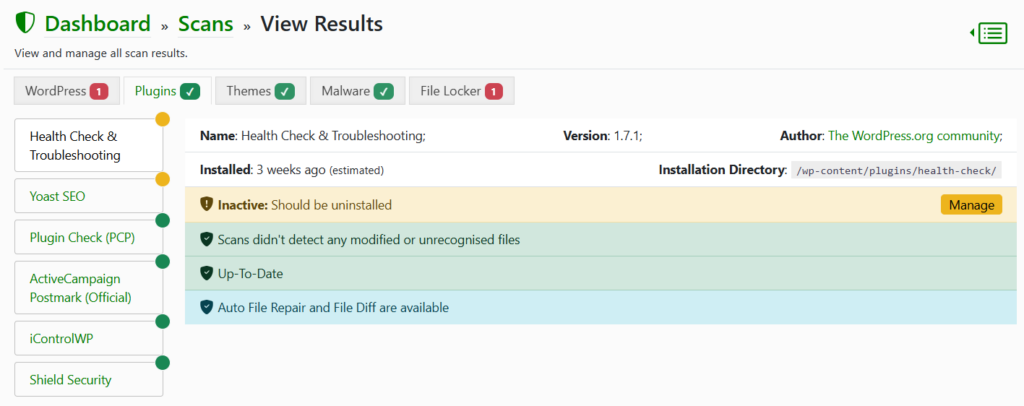
Our own solution Shield Security PRO offers advanced features to ensure the safety of your database. With its MAL{ai} powered scanning, our premium plugin identifies vulnerabilities and detects malicious code patterns that may compromise your database. Subscribers are able to stay one step ahead of all potential threats.

Custom security rules enable precise control over database access and monitoring. By tailoring these rules to your specific needs, you’ll have complete control over who has access to sensitive data.
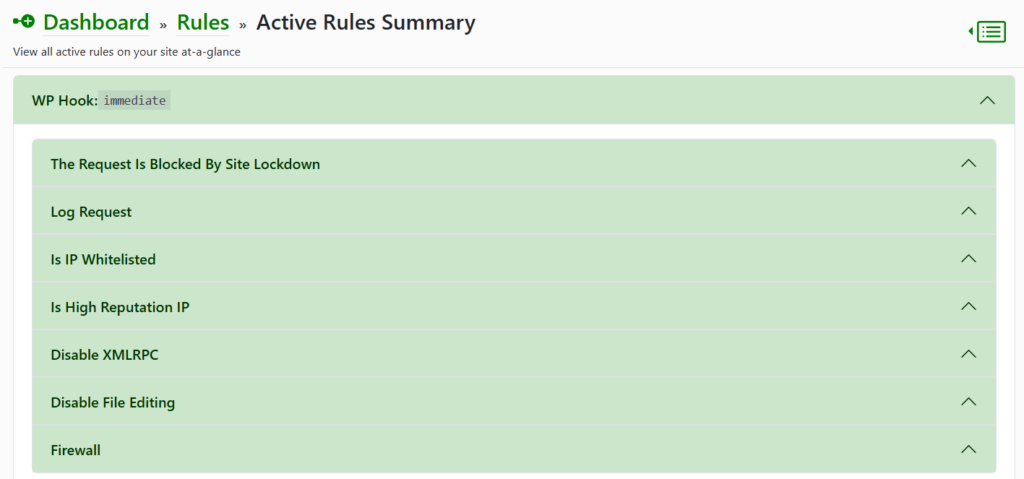
Shield Security PRO’s automated security measures integrate with WordPress core database functions, protecting your site against unauthorised modifications. This includes mechanisms that prevent changes from unknown sources, safeguarding your data integrity. By connecting restoration efforts with ongoing prevention, proactive monitoring ensures that vulnerabilities are addressed before they can be exploited.
If you’re ready to protect your site and join our collaborative defence network, try Shield Security PRO today.


