Imagine, your website is down and you need to install or activate a certain plugin, maybe you simply don’t have login access and time is of the essence. Trying to upload the plugin doesn’t do the trick, it’s not showing up as activated. This can be quite the pickle.
If you can relate to this scenario then keep reading, this is the perfect article for you.
In this tutorial, we will show you how to install and activate a WordPress plugin via FTP when you don’t have access to the wp-admin dashboard.
But first, what is FTP?
FTP is a protocol for transferring files over the internet. To use this protocol you’ll need to install an FTP program onto your computer, such as Filezilla, and connect your computer to your website via FTP by entering your login credentials.
You can get these credentials in your hosting dashboard, from your webmaster, or from your hosting company’s support team.
Note: If no port is specified and your login info isn’t connecting, try port# 21.
Once you’ve logged in to your WordPress installation using FTP, navigate to the “plugins” folder. You’d want to upload your plugin’s folder into that directory.
Remember – always backup before making any changes or updates! 😉
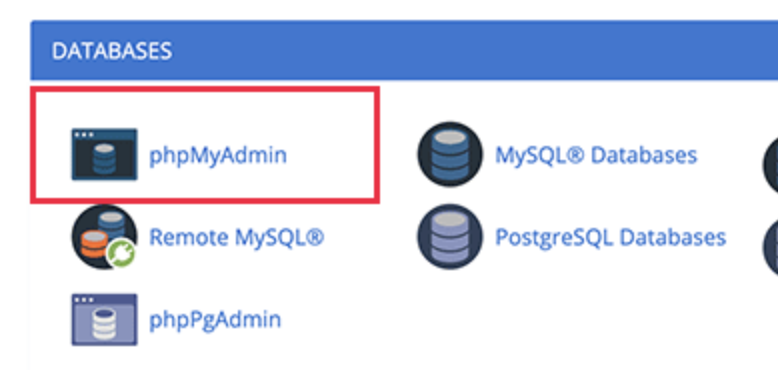
Next, navigate and log into phpMyAdmin. This is where you access the database of your WordPress install. phpMyAdmin is usually found in the dashboard of your hosting account. If you can’t access it there are tools you can use on your local device such as the phpMyAdmin free software tool where you’d need your database credentials to log in.
Again, you can get these credentials in your hosting dashboard, from your webmaster, or from your hosting company’s support team.
Find the database name that corresponds to the one you’d like to edit and click the plus icon to open its contents. Scroll down that list until you find the table name that ends with “options.”

There are a few options when trying to find the right row:
- In the options table, click on the column heading “option_name” to sort the table rows by name. This should make active_plugins the first table row.
- Use the “Filter rows” box and type in “active_plugins”. Be sure to set your “Number of rows” to 500 so that it looks at all of the rows, not just the ones showing on the screen.
- Enter the following command in the SQL tab in the very top menu of the options screen:
- SELECT* FROM wp_options WHERE option_name=’active_plugins’
Click the Edit link on the active_plugins row.

There might or might not be content in this field, and it might look confusing, we know.
Let’s break it down for you.
This is an example (cleaned up and easily read by a human) of an entry with active plugins:
A:5;{
i:0;s:19: “Akismet/Akismet.php”;
i:1;s:43:”dashboard-widgets-suite/dashboard-widgets.php”;
i:2;s:31:”disable-embeds-disable/disable-embeds.php”;
i:3;s:32:”disable-emojis/diable-emojis.php”;
}
This is WordPress database code so we’d need to keep the syntax(format).
Let’s take this example:
i:0;s:19: “Akismet/Akismet.php";
0 stands for the first item in the list so it has an index (i) of 0 and the string value (s) is 19 characters. It is one of the active active_plugins.
Note: A;5 { means there are 5 active plugins on the site.
To activate your plugin you’d want to follow the same format so if you’d like to add and activate another plugin, such as Shield Security, you’d add something like this to that input:
i:6;s:32:"wp-simple-firewall/icwp-wpsf.php";
As you can see we entered the name of the plugin directory followed by a slash (/) and the plugin file. Since it is going into the example above, we gave it an index value of 6 (i:6).
We want to keep the values in ascending order so that it looks good and has correct syntax.
If there is any whitespace you need to remove it before you save or it won’t work correctly.
Your end result (in this example) would then look like this:
A:5;{i:0;s:19: “Akismet/Akismet.php”;i:1;s:43:”dashboard-widgets-suite/dashboard-widgets.php”;i:2;s:31:”disable-embeds-disable/disable-embeds.php”;i:3;s:32:”disable-emojis/diable-emojis.php”;i:6;s:32:"wp-simple-firewall/icwp-wpsf.php";}If everything looks good, hit “Go” at the bottom right of your screen.
There you have it, your plugin should be installed and active on your site, yay!
If there are any other issues be sure to run through all these steps again. Keep in mind, sometimes there are other code issues in your site that might be causing issues such as malware or broken code.
If you have any specific issues and still need help reach out to a WordPress backend developer so they can troubleshoot it.
We hope this article helped.
Comment below if it did and we’d love to know if you’ve ever ran into this type of issue and why!