We’re always on the lookout for ways to improve security on our WordPress sites. But equally, we want to make security easier and more accessible.
With the release of the Shield Security plugin, we’ve done just that. Version 4.17 adds full support for Google Authenticator within the WordPress login.
We will show you our approach to it, and how you can easily add multiple layers of security to your site login.
The Basics – What is Two-Factor Authentication?
First up, let’s cover our bases and get the fundamentals out of the way. What is 2-Factor Authentication?
When you log into any site or service, you will have a unique username and a password associated with it, right? This password is your “single”-factor authentication. That is, with that 1 factor alone (your password) you gain access to that account.
If anyone guesses or cracks your password, your account is wide open. How can we prevent this from happening? We add another factor to the login process.
When you add another factor to the login process, it then becomes two-factor authentication. This makes it that bit harder for anyone to get into your account.
If you again add a another factor, this creates a multi-factor authentication process. In-fact, you can add as many factors as you desire.
What types of two-factor authentication options are out there?
There a many types of 2-factor authentication systems available to us. Probably the most common and versatile is email. This is where after you log into a service, you will receive an email with a link or code for you to complete your login.
This email verification ensures that the person logging into the service is in-fact the real person that owns the account. Chances are slim that a hacker has cracked both your password and gained access to your email account. Slim, but not impossible.
So, it’s good to have other completely independent way to verify your identity. Here are some available:
- Phone / SMS
- Google Authenticator (originally for Google/Gmail accounts)
- Authy
- Clef
- Duo
- Yubikey / Yubico
Each of these has their own various methods and advantages over the other. Some are free, some are premium. Some require extra hardware, or perhaps an App on your smartphone.
But what about WordPress?
What 2-factor authentication options are available for WordPress?
WordPress has only single-factor authentication out of the box. You have a username and password. Simple.
This leaves it susceptible to brute force attacks. If someone guesses your username and password enough times, they’ll eventually get in.
With our Shield Security plugin we have offered two-factor authentication by email all the way back to v1.2.0. That’s a long time!
Email-based two-factor authentication is a highly effective system. But, it does have issues, such as:
- many web hosts block outgoing email
- many email accounts filter messages as spam with certain links
- end-users can find it a little cumbersome
With version 4.17 we’ve added a much requested authentication option – Google Authenticator.
What is Google Authenticator?
Google Authenticator is a App. You install it on your phone. This app implements a TOTP – a Time-based One-Time Password system.
A TOTP is a password that is automatically generated at a fixed period of time, say every 30 seconds. You then use this unique password to log into your account.
So, you’ll have your normal account password, plus another password that changes every 30 seconds that only you know.
Brilliant! That’s pretty cool security.
This is a nice improvement over email. Even if a hacker gets into your email account, they wont have your random password that’s constantly changing.
So how does Google Authenticator actually work?
You will need to install the Google Authenticator app on your smartphone. There are alternatives to what I’m about to outline, but this is the basics of it.
Activating the Google Authenticator of any system operates in this basic way:
- You are provided a unique, secret code that is used to generate these random passwords (usually in the form of a QR code to scan)
- You use the Google Authenticator app to save this secret code on your phone
- Your phone then creates random passwords for you to use when you into your service (i.e. your WordPress sites)
Very easy!
How to set-up Google Authenticator for WordPress
First you’ll need to install your Shield Security plugin.
There are 2 steps to turning on Google Authenticator. First, you must enable it in the plugin. Then, you must activate it for your own particular WordPress user account.
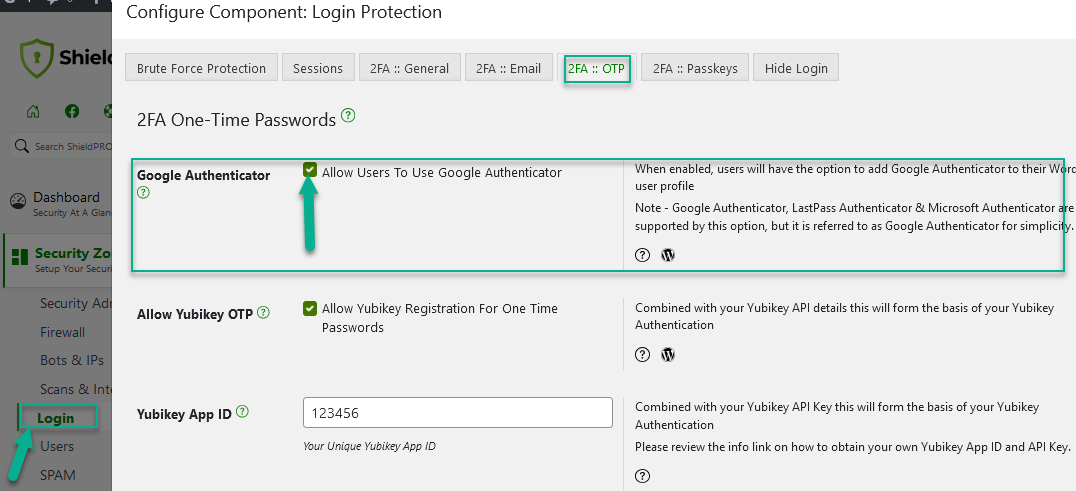
Turn on the option in the plugin (see screenshots below):
- Go to the ‘Login Protection’ zone under the Shield Security Zones menu
- Click on the tab labelled ‘2FA: OTP’
- Check the box beside ‘Google Authenticator’
- Save options
Now add it to your WordPress user account:
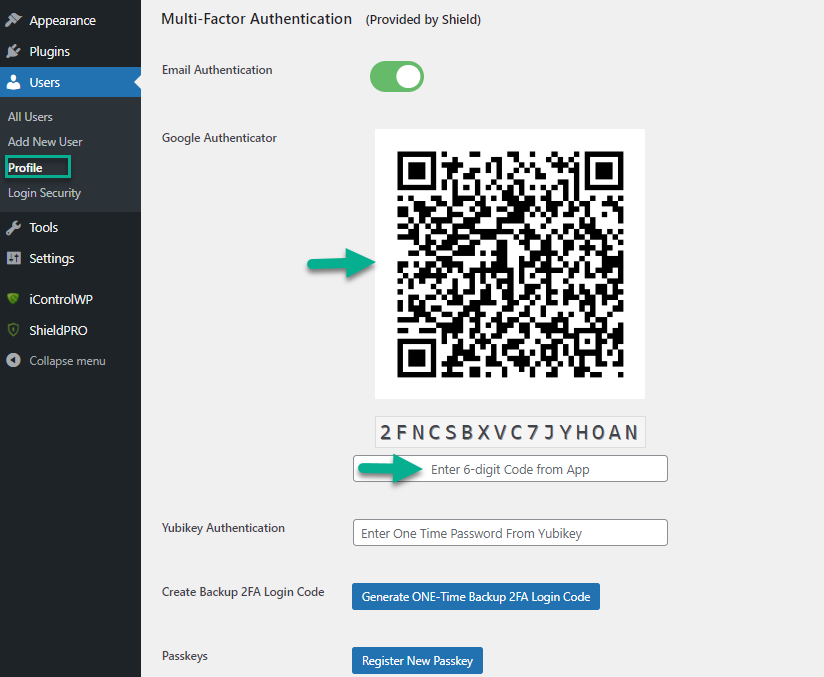
- WordPress: Go to your WordPress user profile (Users > Your Profile)
- WordPress: Scroll down to the bottom and you’ll see a QR code to scan
- Phone: Install the Google Authenticator App on your smartphone
- Phone: Select to ‘Add Account’ from within the Google Authenticator app
- Phone: Scan the Google Authenticator QR code that has been presented to you
– You will also be given the option to type in a code which is a series of 16 letters. This is an alternative to the QR code, but has exactly the same result. - Phone: If this is successful, it will add the new account to your phone and display a 6-digit number
- WordPress: Use this 6-digit number and enter it on the same page you scanned the QR code in step 5
- WordPress: Save this page.
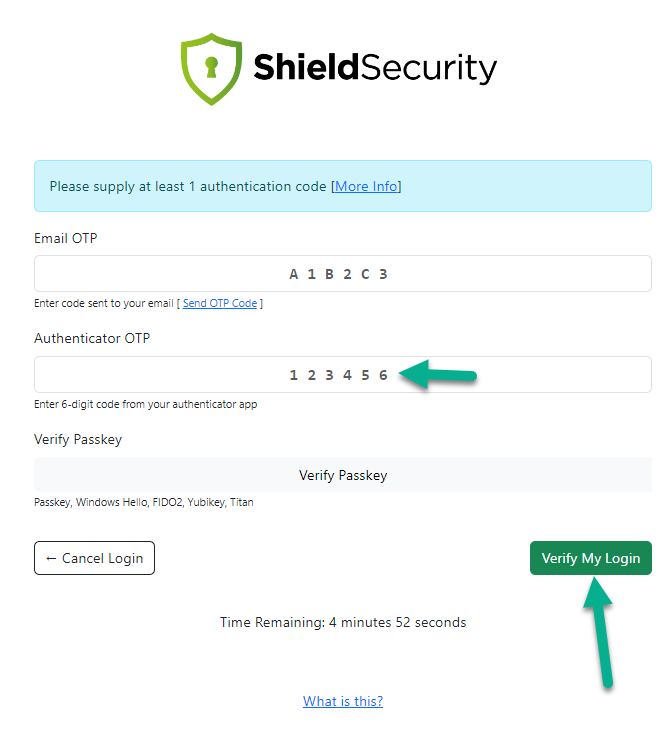
See the screenshots below that highlight some of the steps above:


If you follow these steps correctly and the App accepts your code, then going forward you must always provide the codes generated by the App as you login.
Warning: When the IP Manager is on, repeated login attempts that fail will result in a ban of your IP address. So please take care.
Warning!
When this is activated on your WordPress account you must understand one very important fact.
If you lose your phone, or you delete your Google Authenticator app from your phone, you will lose access to your account.
Yes, that’s right, you will not be able to login.
So what can you do? As an site administrator, you use the tools built into this plugin to regain access once again.
Also, here are some other configuration settings you should be aware of when you use this feature:
- Site administrator may remove Google Authenticator from any non-administrator account.
- Site administrators may not remove Google Authenticator from any administrator account.
- No-one can add Google Authenticator to any account, except their own.
Suggestions, Feedback, Hopes and Fears?
If you have any issues with this, or questions about the feature, please let us know below in the comments section.
Ideally, please use the support forums to ask for help.


no good for me, I only have a “dumb phone” — you know, the old fashioned cell phone that is actually used to make & receive PHONE CALLS?
no texts, only phone calls..
Hi Tom,
Oh dear, sorry to hear that! When you get yourself a smartphone you’ll be able to take advantage of this, and all the other services that use Google Authenticator to sure up their security.
Not only that, you could use the Email authentication already in the plugin, or get yourself a Yubikey and use that too! Lots of options 🙂
Is an SMS service something you’d like to see added to the plugin?
Thanks for your comment!
What if I am already using Google Authenticator for my Google account? Do I need to go through the app setup process or do I use the current codes already being presented by the app? If I go through the setup for the app on my phone, will it affect using it for my Google account?
With Google Authenticator already installed on your phone, you don’t need to reinstall it. From within the App, click to “Set Up Account”, then go through the process of scanning the QR code etc (step 5 above). This will create a brand new entry on the App.
Assuming you don’t remove or edit any existing Authenticator accounts on your phone, going through this process will not affect your Google account or any other account on there.
Hope that helps!
Hi, unfortunately I´m getting “Invalid Barcode”… Barcode not guilty..
Have you tried this with multiple codes? If so, then your app probably has an issue as this code/chart is regenerated anew every page load.
If the QR code isn’t working for your app, then you can use the 16 digit secret below the QR code.
Thanks.
How about nagging other users to enable and configure it? May be give them some time limit to configure or be locked out? May be the admin can make it mandatory for some users and not for others?
Hi Umair,
Thanks for the suggestion for this, but I think this sort of thing is really down to the site administrator to manage. There are 101 ways to implement and enforce security policies and everyone does it differently. I’ll have a think about how this can be done in a scalable way.
Thanks again for your security suggestions!
Outstanding post! Thanks for sharing your great experience through this effective and helpful tips.
Hi,
I have started using this plugin, it looks awesome, but I’m little bit puzzled with authenticator app. As an admin, is there any other way to gain access in the event of mobile lost or App was deleted..? if no, then I’d disable this feature.
You will always be able to disable the plugin features easily by following the guide laid out here:
https://icontrolwp.freshdesk.com/support/solutions/articles/3000000959
This will turn off the security features of the plugin and allow you to change and reset any settings you need.
“If you follow these steps correctly and the App accepts your code, then going forward you must always provide the codes generated by the App as you login.”
I followed the instructions, but I am still able to log in even though I’m providing only username and pass and no Google Authenticator code…
Any suggestions?
Thanks,
Brad
sorry. figured it out. I didn’t update profile page after entering code under qr.
thanks
Hi, this might be a dumb question, but how do I get my users (both bloggers and customers) to sign set up this feature? It seems like they can log in just fine until the set it up, but if they don’t ever, then the security isn’t really doing anything? What am I missing here? Cheers!
Hi Levis,
This article demonstrates how users can add Google Authenticator to their account. Shield does not currently enforce Google Authenticator for users. So for now you’ll have to communicate with them… tell them to turn it on.
We may add security policies to the plugin at a later date. Thanks for the suggestion!
If you are locked out of your site because you no longer have access to your Google Authenticator app you can login to your site using Filezilla. Go to the plugin directory, right click and choose “create a file” named “forceoff” and then load your website in a browser to activate it. You can now login to your site to access the Shield plugin dashboard and turn off Google Authenticator. You will be kicked out and have to login again. While you are logged in and also connected via FTP you will need to delete the file “Forceoff” from your FTP login and create another file named “Forceon” and once again load a web page from your site to activate it. You will be kicked out again and have to login. Now you can login with Google Authenticator still off, access the Shield Dashboard and turn it back on, but in order to turn Google Authenticator on again you will need to delete the “Forceon” file. Next, go to your new Google Authenticator app and choose “Add Site” to scan the barcode, access your user profile to scan the barcode and the rest is self-explanatory. Hope this helps.
Be sure you are in the Shield Plugin directory to use “Forceoff and Forceon.”
If you are able to use google authenticator, then a programmable hardware token should also be an option too. Most of the programmable tokens would need to be prepared either via NFC on a mobile phone, or an NFC programmer, but once prepared the tokens should act as a direct replacement and would work independently of other devices (press the button to get the OTP code on the built in screen).
Is it or will it be possible to use Authy? I don’t use Google Authenticator, and this is the only platform that I use that only supports it.
Thanks so much for your question.
The Authy App also handles Google Authenticator 2FA code registration.
You can enable Google Authentication option in Shield and then instead of using the official Google Authenticator app, you can use the Authy App instead. We go into further details on this here.
Thank you so much for clarifying that, Jelena!
There’s no problem at all. Happy to help. 🙂
Cheers!